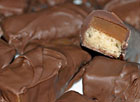
Chocolate Covered Caramels

Yield: About 3 dozen chocolate-covered caramel candies.
Cook Time: About 30 minutes.
Tips: Watch caramel mixture closely during last 5 minutes of cooking.
If you love the flavors of caramel and chocolate, then this Chocolate Covered Caramel recipe is one
you will not want to pass up! Homemade caramel has a flavor, texture and freshness that far surpasses the pre-packaged caramel and chocolate-flavored candies you'll find in stores (that who knows how long have been sitting on the shelves). The amber-colored chewy caramel interior is full of powerful caramel flavor and is surprisingly easy to make!
Making the caramel is just a matter of heating a few ingredients on the stovetop for 30-40 minutes with some occasional stirring. The caramel candy is then cooled and cut into bite-size pieces. Once cooled, the caramels are ready to coat with your choice of melted milk or dark chocolate. In a short time, the chocolate will firm up and you will have a batch of delicious melt-in-your-mouth chocolate-coated caramel candies that stay fresh for a week or two in an air-tight container.
Making the caramel is just a matter of heating a few ingredients on the stovetop for 30-40 minutes with some occasional stirring. The caramel candy is then cooled and cut into bite-size pieces. Once cooled, the caramels are ready to coat with your choice of melted milk or dark chocolate. In a short time, the chocolate will firm up and you will have a batch of delicious melt-in-your-mouth chocolate-coated caramel candies that stay fresh for a week or two in an air-tight container.
Recipe▼
Ingredients
- 1 cup granulated sugarz
- 1/2 cup brown sugar
- 1/2 cup light corn syrup
- 1 1/2 cups cream
- 4 tablespoons butter
- 1 teaspoon vanilla
- 6-8 oz. milk or dark chocolate (candy bar or chocolate chips)
Directions
Caramels
Combine all ingredients except vanilla in a medium saucepan. Cook and stir over medium heat until mixture comes to a boil. Continue cooking 30-40 minutes, stirring occasionally, until mixture reaches firm ball stage* (248° F). (Note: During the last few minutes of cooking, watch caramel mixture closely to ensure it does not begin turning dark in color, as this will result in a tough caramel.) Remove from heat and stir in vanilla. Pour mixture into a buttered (or parchment paper-lined) 9x5x3-inch loaf pan or other pan of similar size that will produce a sheet of caramel about 1/2 to 5/8 inch in height. Allow to cool.
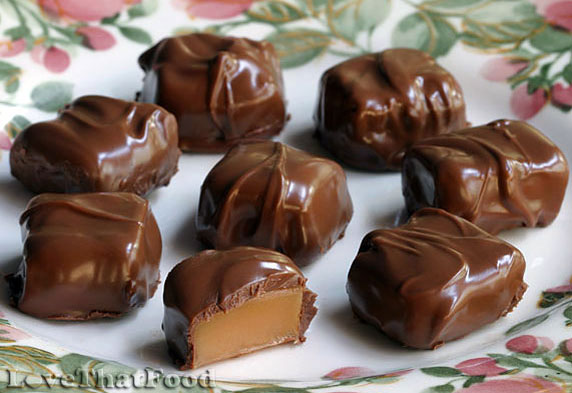
Once cooled, transfer sheet of caramel to a cutting board and cut into squares, rectangles or other desired shapes, then wrap individually in small pieces of wax paper, twirling the sides to seal (as shown in photo above). (Tip: Place cut caramels on wax paper until you are ready to wrap them, because they might stick to other surfaces.)
*"Firm Ball Stage" is a term used to refer to a certain temperature range when cooking sugars and/or syrups. The common temperature range is between 245-250°. To test doneness without a candy thermometer, simply drop a small amount of hot caramel mixture into a bowl of very cold water. Place your fingers in the bowl and gather the syrup, forming it into a ball. Once a ball is formed, lift it from the water. If caramel has reached the "firm ball stage," it will feel firm and pliable, yet still slightly sticky, and will retain its shape when removed from the water, but will quickly lose its shape when it returns to room temperature.
Chocolate Coating
If you are using a chocolate bar, break bar into pieces. To heat chocolate, place about 1-2 inches of water in a saucepan, and place chocolate in top section of double boiler on top of saucepan (if you don't have a double boiler, you can use a bowl that is slightly larger than the saucepan instead). Heat water over low-medium heat, and frequently check to see if the chocolate can be stirred. (Note: The trick to successfully heating chocolate is to heat it slowly, and to not overheat. Keep the water level low enough that it does not touch the upper pan or bowl, because that will cause too much heat. As long as you heat the chocolate slowly over low heat, you will be fine.) (Note: Alternatively, you can heat chocolate in the microwave by placing in a heat-proof bowl and heating on high for 30-second intervals just until chocolate is able to be stirred into a creamy consistency. Because the chocolate will not be sitting over warm water, you will need to work quickly to coat caramels before chocolate becomes firm.)
As soon as the chocolate is able to be stirred into a creamy consistency, using 2 forks, lift one caramel candy at a time and dip it into chocolate, turning to coat all surfaces. Lift each chocolate-coated caramel and place it on the wax paper to cool. (This process will get easier as you get the hang of it.) To make a design on top, simply allow a small stream of chocolate to drop over the top with the fork. Allow chocolate caramels to cool at room temperature until chocolate sets (30 minutes or more).
Once chocolate is firm, store in an air-tight container for up to 2 weeks.
Combine all ingredients except vanilla in a medium saucepan. Cook and stir over medium heat until mixture comes to a boil. Continue cooking 30-40 minutes, stirring occasionally, until mixture reaches firm ball stage* (248° F). (Note: During the last few minutes of cooking, watch caramel mixture closely to ensure it does not begin turning dark in color, as this will result in a tough caramel.) Remove from heat and stir in vanilla. Pour mixture into a buttered (or parchment paper-lined) 9x5x3-inch loaf pan or other pan of similar size that will produce a sheet of caramel about 1/2 to 5/8 inch in height. Allow to cool.
Once cooled, transfer sheet of caramel to a cutting board and cut into squares, rectangles or other desired shapes, then wrap individually in small pieces of wax paper, twirling the sides to seal (as shown in photo above). (Tip: Place cut caramels on wax paper until you are ready to wrap them, because they might stick to other surfaces.)
*"Firm Ball Stage" is a term used to refer to a certain temperature range when cooking sugars and/or syrups. The common temperature range is between 245-250°. To test doneness without a candy thermometer, simply drop a small amount of hot caramel mixture into a bowl of very cold water. Place your fingers in the bowl and gather the syrup, forming it into a ball. Once a ball is formed, lift it from the water. If caramel has reached the "firm ball stage," it will feel firm and pliable, yet still slightly sticky, and will retain its shape when removed from the water, but will quickly lose its shape when it returns to room temperature.
Chocolate Coating
If you are using a chocolate bar, break bar into pieces. To heat chocolate, place about 1-2 inches of water in a saucepan, and place chocolate in top section of double boiler on top of saucepan (if you don't have a double boiler, you can use a bowl that is slightly larger than the saucepan instead). Heat water over low-medium heat, and frequently check to see if the chocolate can be stirred. (Note: The trick to successfully heating chocolate is to heat it slowly, and to not overheat. Keep the water level low enough that it does not touch the upper pan or bowl, because that will cause too much heat. As long as you heat the chocolate slowly over low heat, you will be fine.) (Note: Alternatively, you can heat chocolate in the microwave by placing in a heat-proof bowl and heating on high for 30-second intervals just until chocolate is able to be stirred into a creamy consistency. Because the chocolate will not be sitting over warm water, you will need to work quickly to coat caramels before chocolate becomes firm.)
As soon as the chocolate is able to be stirred into a creamy consistency, using 2 forks, lift one caramel candy at a time and dip it into chocolate, turning to coat all surfaces. Lift each chocolate-coated caramel and place it on the wax paper to cool. (This process will get easier as you get the hang of it.) To make a design on top, simply allow a small stream of chocolate to drop over the top with the fork. Allow chocolate caramels to cool at room temperature until chocolate sets (30 minutes or more).
Once chocolate is firm, store in an air-tight container for up to 2 weeks.