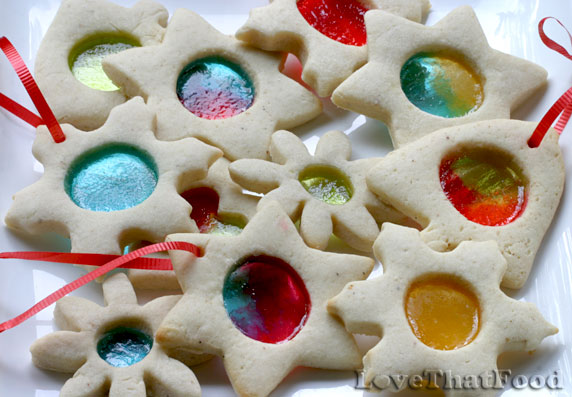
Stained Glass Cookies

Yield: 5 dozen cookies
Cook Time: 6-9 minutes per batch
Tips: To make as Christmas tree ornaments, using a wooden skewer, pierce 1/8-inch-diameter holes about 1/4 inch from top edge of cookies for threading ribbons or strings through after cookies have cooled. Cookies may be decorated around edges with powdered sugar icing, if desired (recipe included). Cookie dough may be made 1-2 days in advance and stored in the refrigerator wrapped n wax paper, though hard candies should be used immediately after crushing, because once crushed, crushed candy can become moist and stick together if left out for too long.
Suggestion: Serve as Christmas cookies (and/or use as Christmas tree ornaments), Valentines Day cookies (in heart shapes filled with red candy), or serve any time of year for any occasion, using any cookie cutter shapes desired.
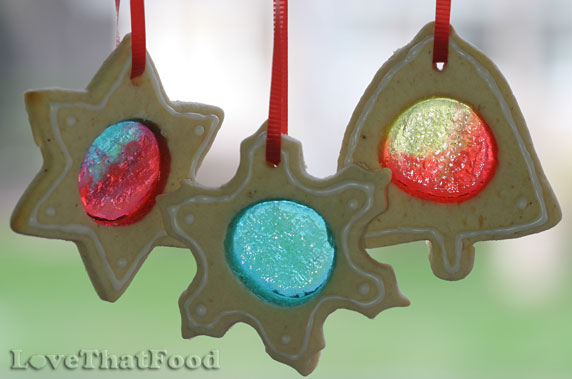
These Stained Glass Cookies (also sometimes referred to as Stained Glass Window Cookies) can be made for any occasion, depending on the type of cookie cutters you use. Stained Glass Cookies are perfect made as Christmas cookies during the holidays, not just because they are so colorful and festive, but because they can be hung on the Christmas tree as Christmas ornaments, simply by piercing a small hole in the cookie before they're baked, then threading some ribbon or string through the cookies once they've cooled. These cookies are also perfect served on Valentine's Day, made as heart shaped cookies using two different sizes of heart shaped cookie cutters (one for the cookie itself, and a smaller one to create a cut-out
heart shape in the center of the cookie). When using these cookies for Valentine's Day, you'll likely want to use only red colored candies for the centers to fit the Valentine's Day theme. Of course, these Stained Glass Cookies can be made any time of year, whether to celebrate a holiday, party or other event, simply by using the cookie cutters that suit the occasion.
To create the stained glass window effect in the cookie centers, hard candies (such as Jolly Ranchers, Life Savers, butterscotch candies or other hard clear colored candies) are crushed into small pieces, then placed into the cut out cookie centers. While the cookies bake, the candy melts and fills in the cookie center. Once the cookies have completelly cooled, the candy becomes hard again, and that pretty colorful transparent stained window glass effect is created! You can use one or two colors with each cookie (or more if the cut out cookie center is large enough), as long as you keep the different colored candies separate from one another.
For an added decorative effect and a touch of additional sweetness, you can decorate these Stained Glass Window Cookies with some powdered sugar icing (recipe included). Whether you refer to these cookies as Stained Glass Cookies or Stained Glass Window Cookies, these colorful cookies will brighten up any occasion!
Recipe▼
Ingredients
- Cookies
- 1 1/3 cups butter
- 1 1/3 cups sugar
- 1/2 cup milk
- 4 eggs, well beaten
- 1 1/4 teaspoons nutmeg
- 5 1/4 cups flour
- clear hard candies, such as Jolly Rancher, Life Savers or butterscotch candies
- Decorative Icing (optional)
- 2 cups confectioner's (powdered) sugar
- dash salt
- 1 teaspoon vanilla extract
- milk, light cream or half and half (as needed to create desired consistency)
Directions
Cookies
Preheat oven to 350°F.
In an electric mixer bowl, cream together butter and sugar. In a separate mixing bowl, whisk together milk and eggs, then add to butter mixture and mix until blended. In another separate mixing bowl, whisk together flour and nutmeg, then gradually add to butter mixture, mixing until fully blended. Wrap cookie dough in waxed paper and place in the refrigerator to chill for about 1 hour.
Lightly sprinkle a work area with flour. Place cookie dough on sprinkled flour, then roll to a 1/4-inch thickness. Cut into medium or large cookies using any cookie cutters of your choice.
Transfer cookies to a baking sheet that has been lined with parchment paper, placing about 1 inch apart. (Tip: Moving the cookies from the work area is easiest using a thin metal spatula that is frequently dipped in flour to prevent cookies from sticking to work surface.) Once cookies have been placed on baking sheets, using a smaller cookie cutter, cut out smaller shapes from the centers of each cookie, making sure the edges remaining on the cookie are at least 1/4 of an inch wide. (Note: Smaller cookie cutter may be the same shape as the large cookie cutter, or any other shape may be used).
One color at a time, place candies on a cutting board and cover with plastic wrap, a plastic bag or wax paper. Lightly crush with a meat pounder or other flat utensil until pieces are the size of small pebbles. Be sure to keep each color separate from one another! Fill cookie centers with the crushed candies, 1 or 2 colors to a hole (or 3 colors if holes are large enough). Colors should be placed side-by-side and should not be mixed together. If you will be using the cookies as ornaments, before baking, pierce an 1/8-inch hole through the top of each cookie with a wooden skewer, ice pick or thick toothpick, making sure it is at least 1/4 inch from the edge of cookie.
Bake for 6-9 minutes or just until candy melts. When removing baking sheets from the oven, be careful to move them carefully and steadily so as not to disturb the liquified candy. Allow cookies to cool for about 5 minutes or until candy solidifies, then gently lift and move cookies to wire racks to completely cool.
Store in a cool place in a sealed container, being sure to place a sheet of waxed paper on the very bottom of the container and between each layer of cookies to prevent cookies from sticking to bag or one another. (Tip: Do not place cooled cookies on plates, baking sheets, trays or any other surface unless covered with wax paper, because candy will likely stick to surfaces and may be difficult to remove, thus risks breakage.)
Decorative Icing (optional)
In a medium mixing bowl, add vanilla and dash of salt to powdered sugar. Add just enough milk or half and half to desired spreading consistency, stirring in between each small addition of cream until blended. (Note: If you accidentally make the icing too thin, simply stir in a small amount of powdered sugar until you reach desired consistency. Apply icing to cookies as desired.